ETL Pipeline with Azure Data Factory and Azure Databricks to process CSV files of global emissions and the planet temperature along the years.
Overview
The main goal of this project was to learn how a typical cloud ETL works. I've learned along the way, the only knowlege I had was the concepts from Azure Data Fundamentals that I completed recently. With that in mind I've searched in Kaggle for some datasets to play with, and I selected the Global Emissions C02 dataset and the Global Temperature. The idea was to load the file into a Azure Storage Account, process it with an Azure Databricks notebook (with PySpark) and load the processed file into a customly designed data model into a SQL Server database. This was accomplished with a creation of an Azure Data Factory Pipeline.
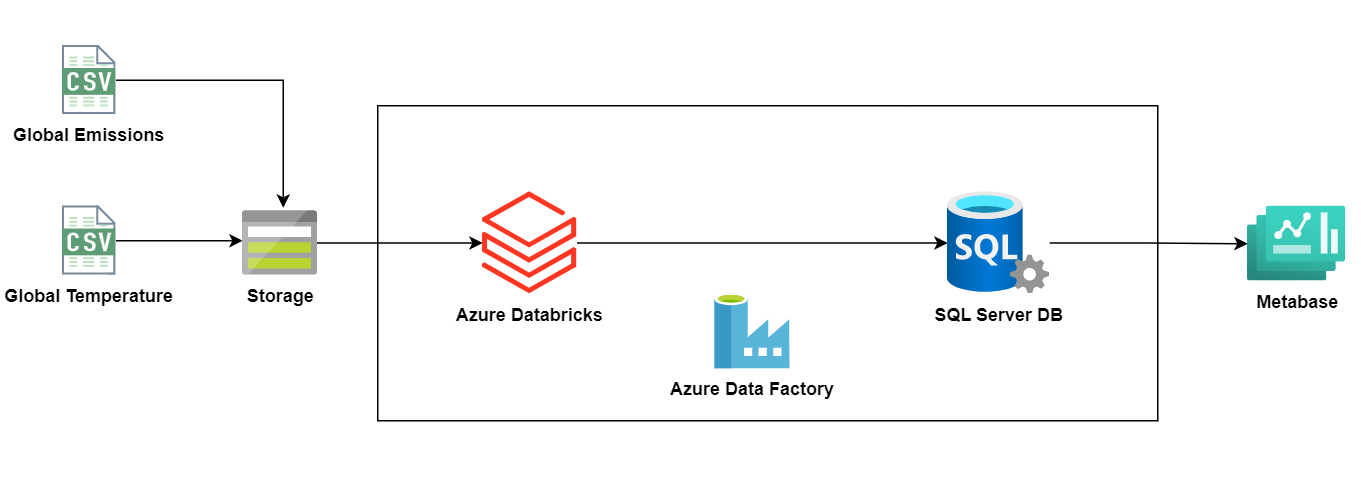
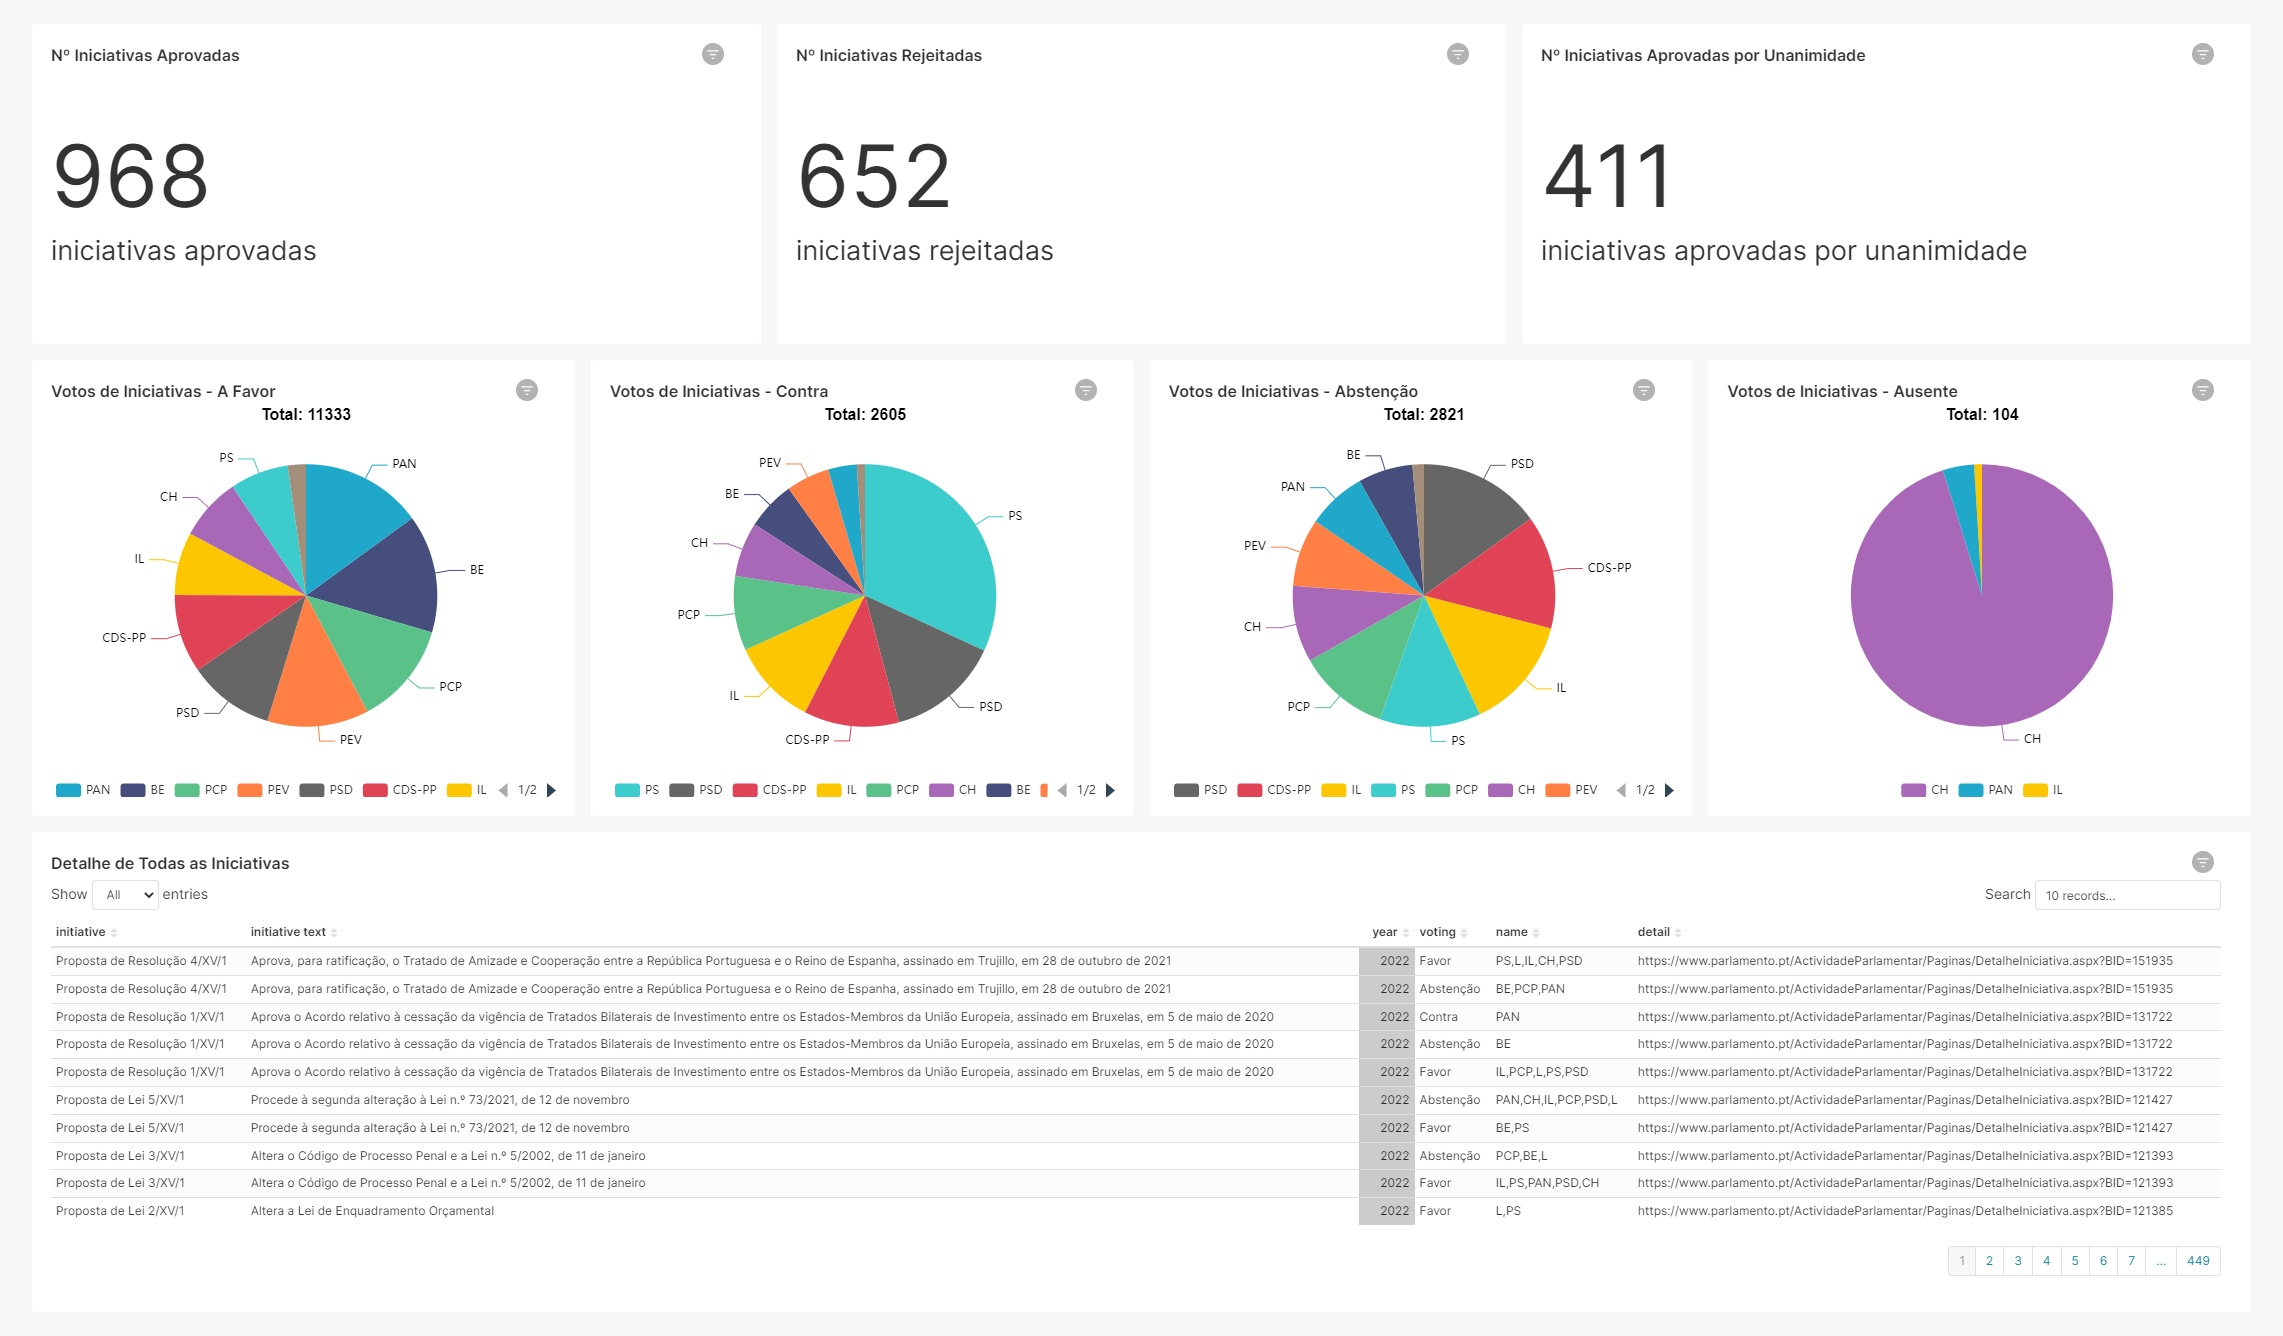
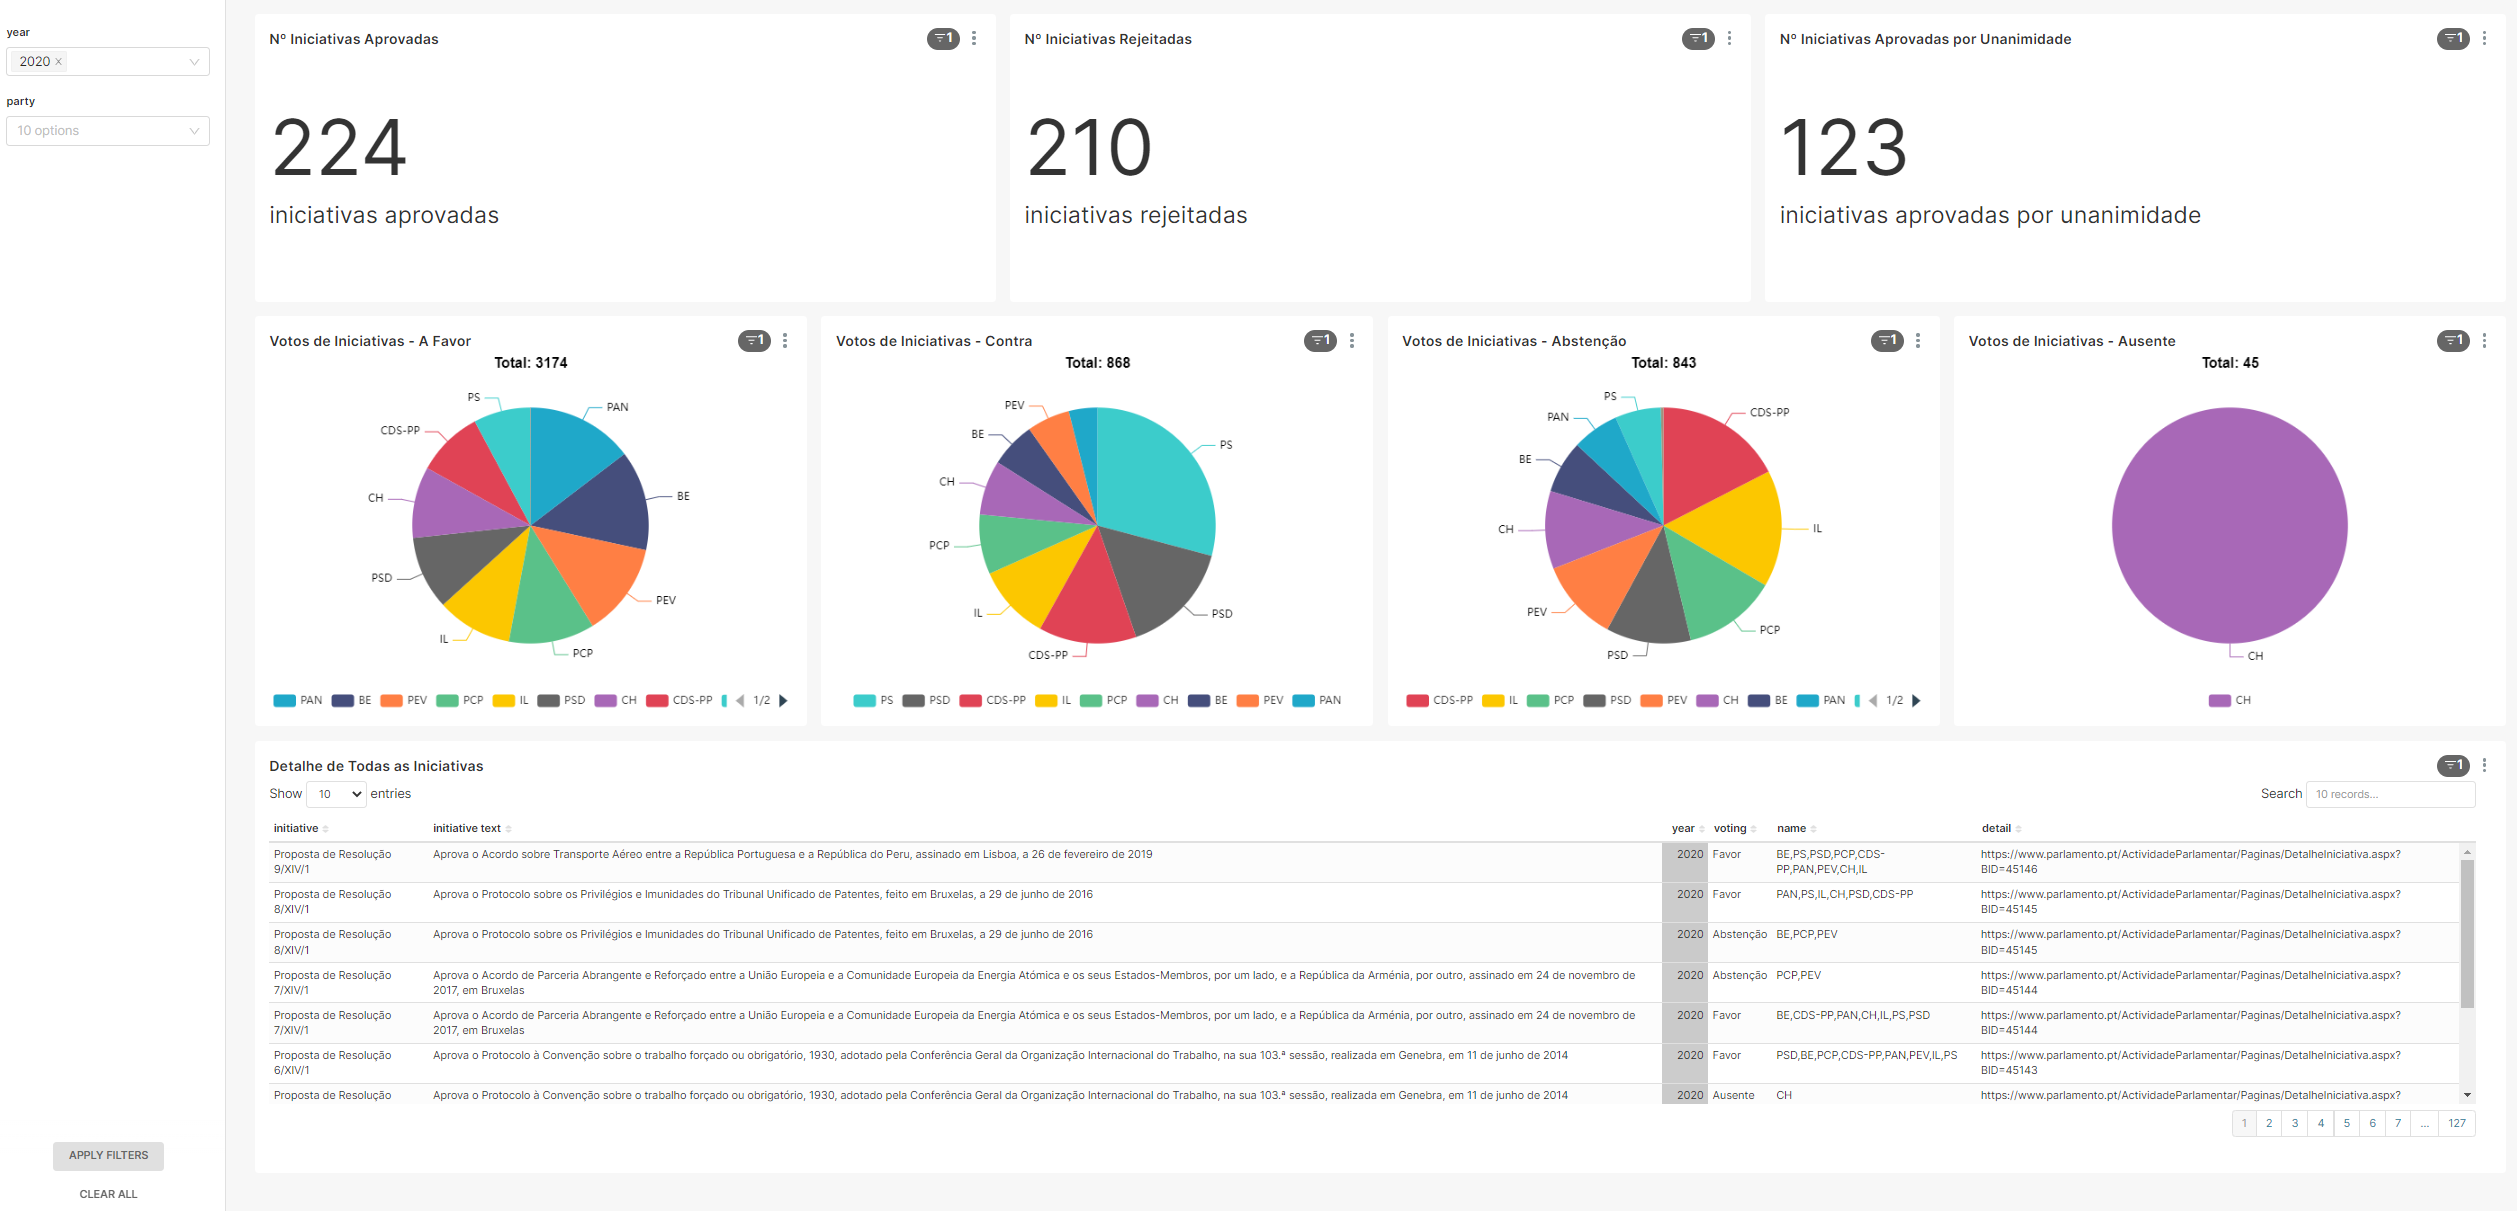
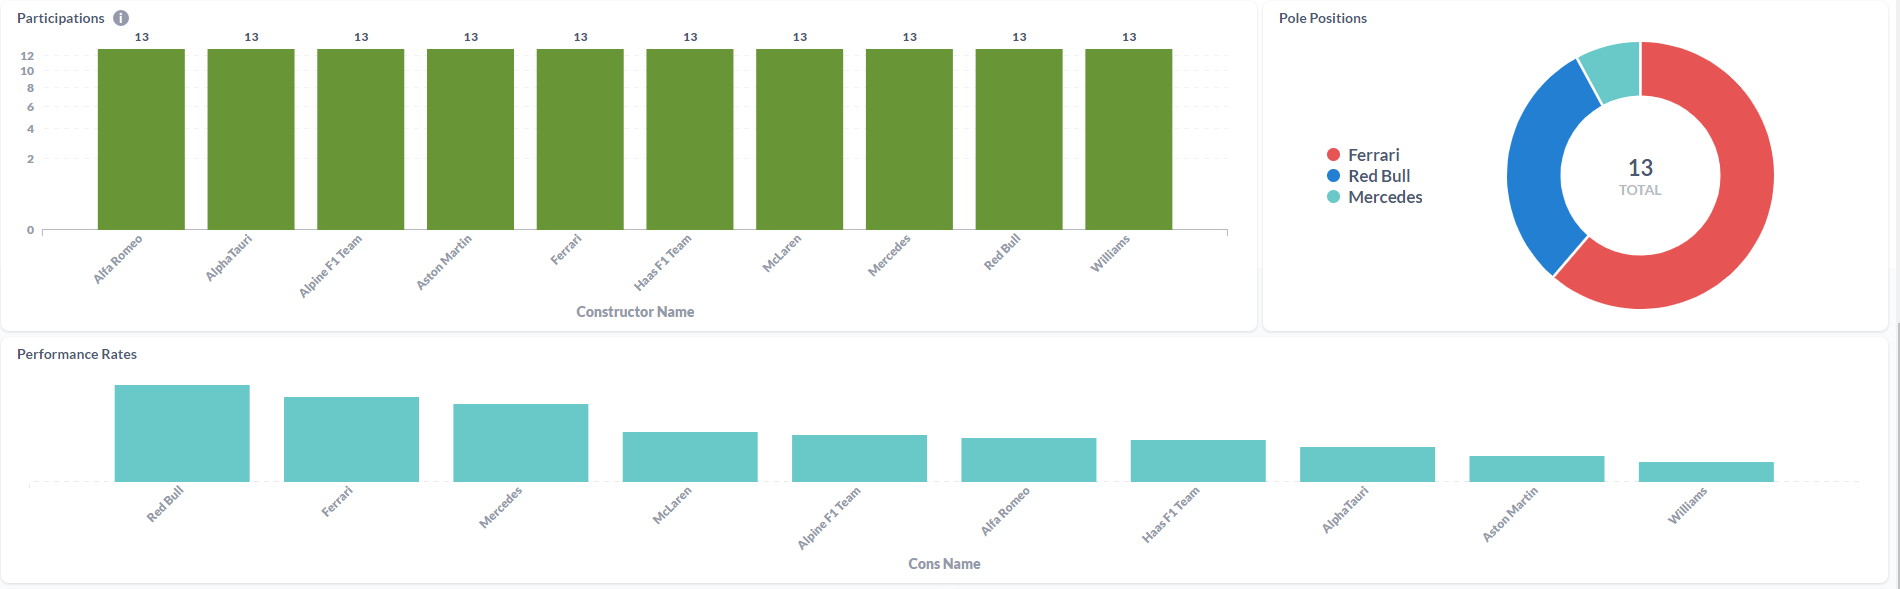
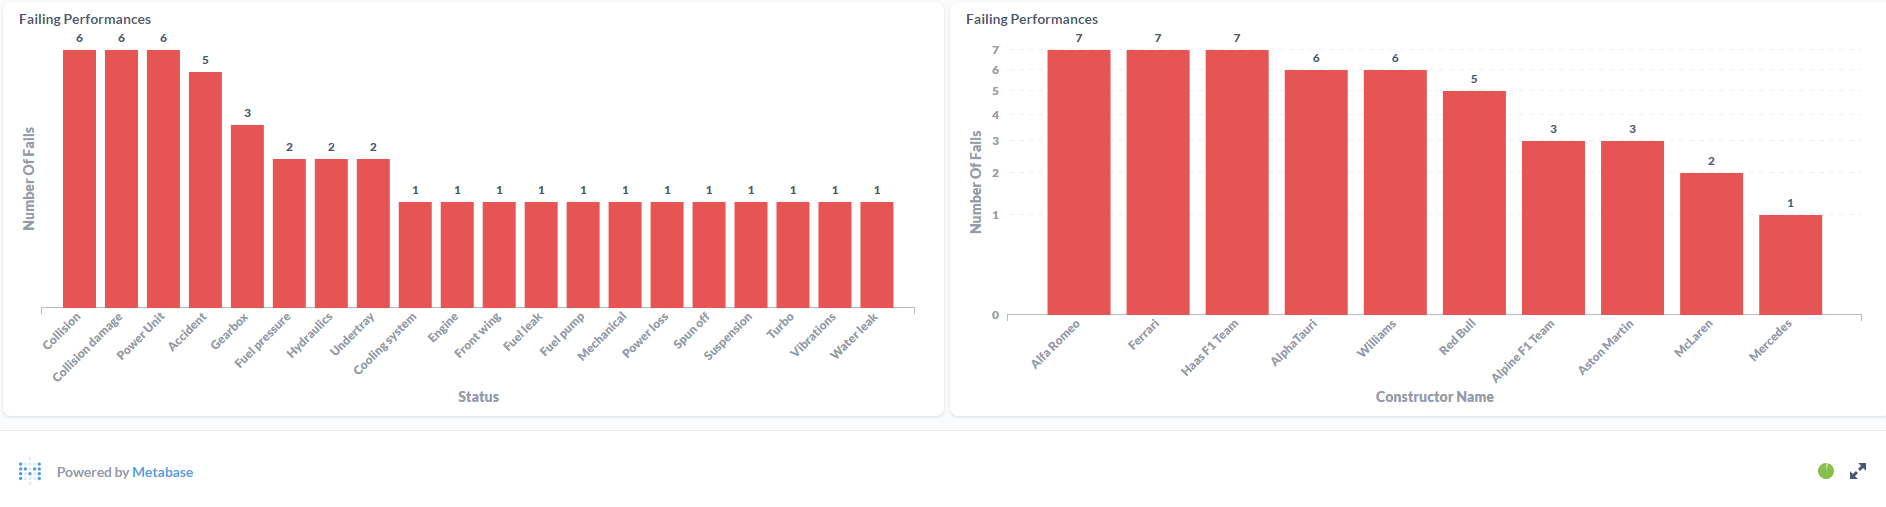
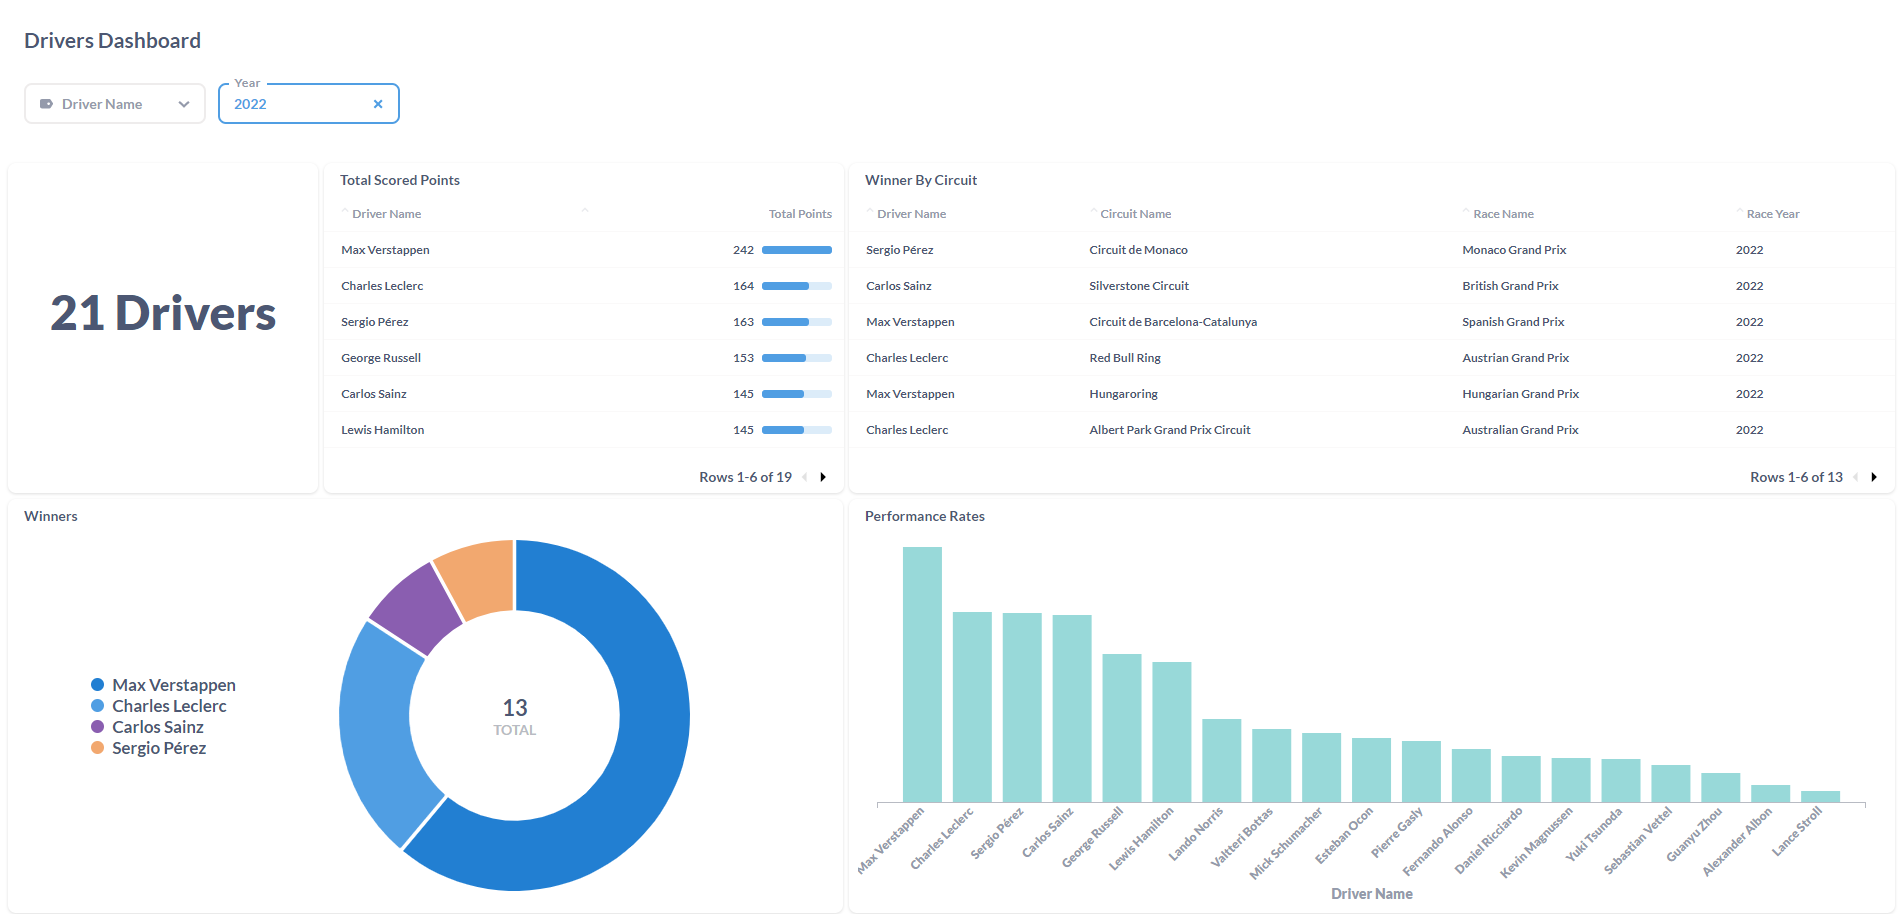
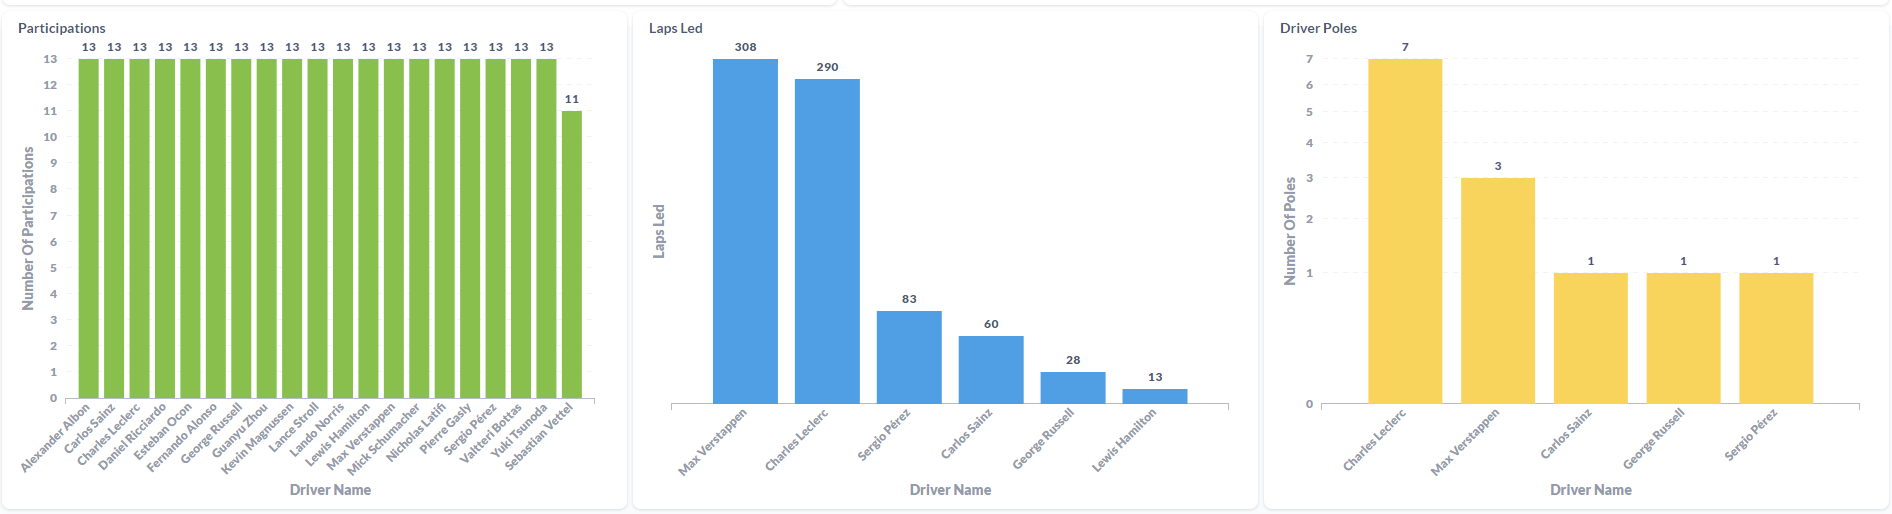
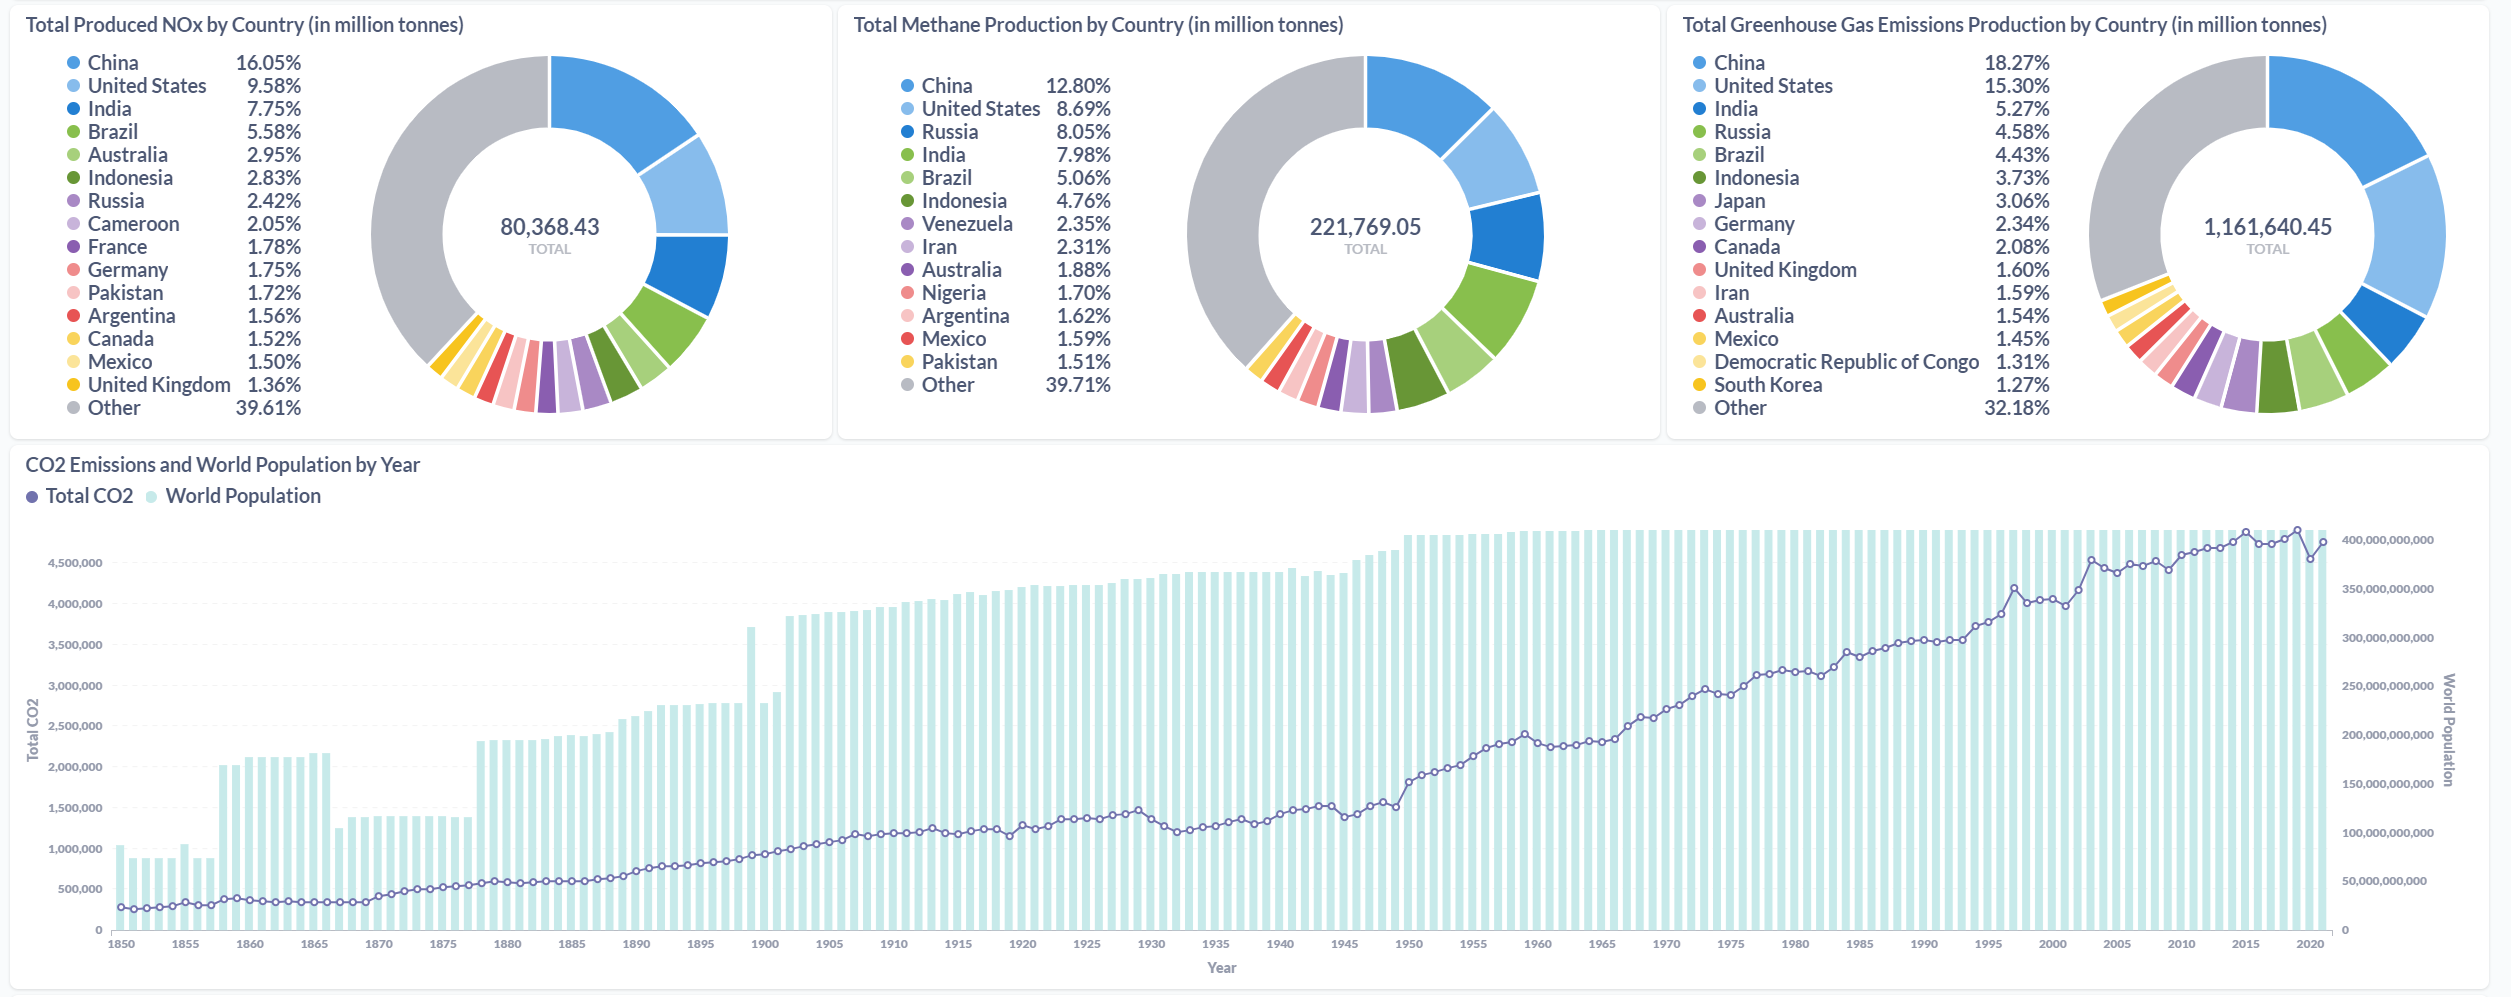
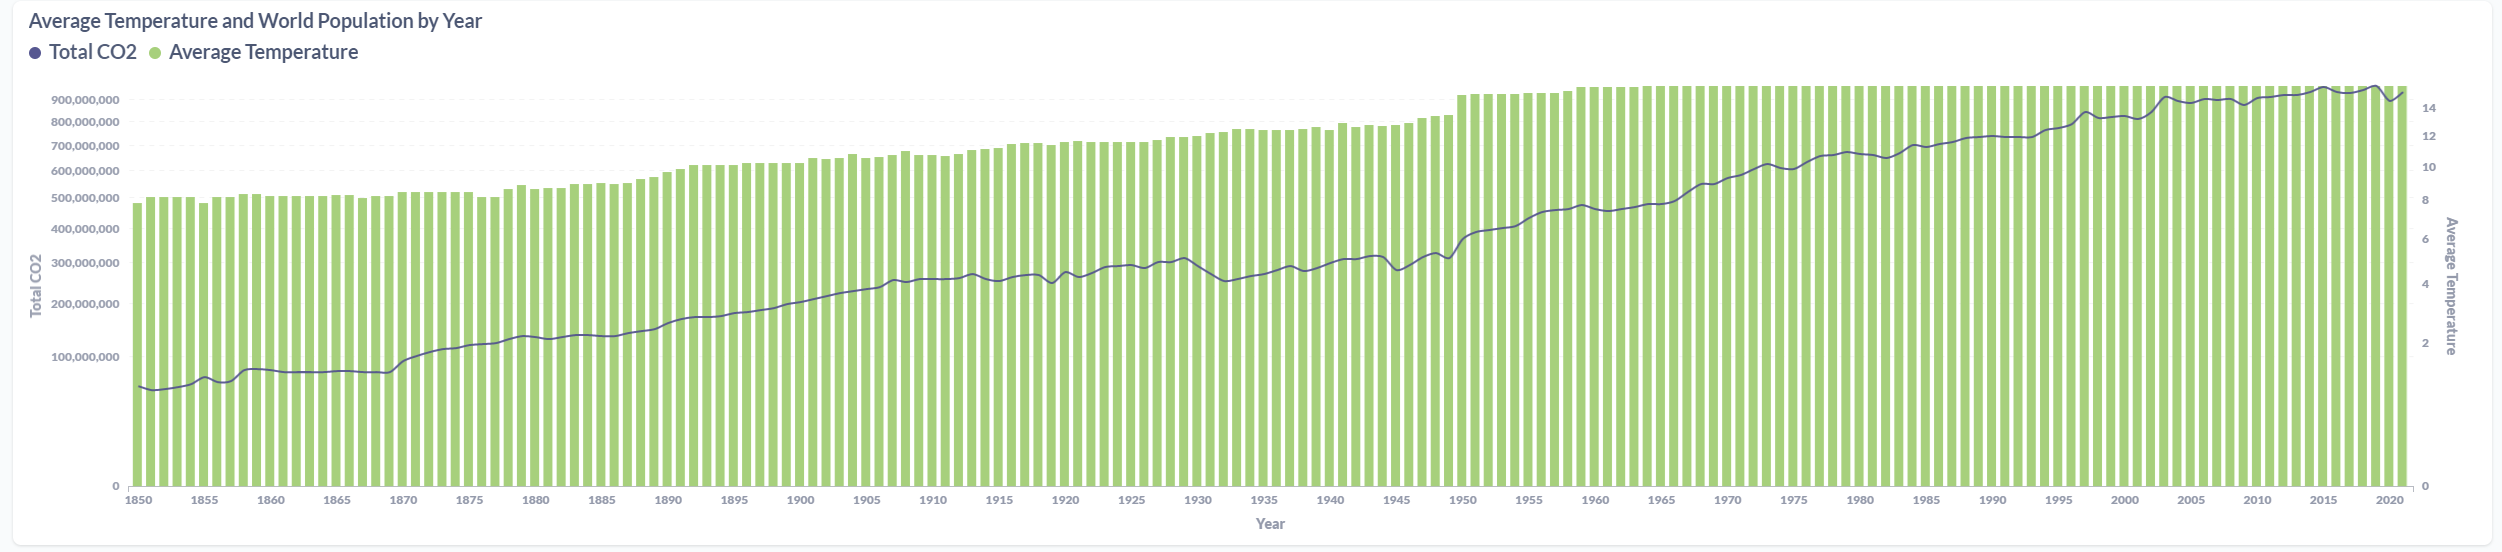
After processing the files and loaded the information on the SQL Database, the final results were displayed in a Metabase dashboard.
Azure Data Factory
This part of the project was the one that I was most curious about, because of it's potential. I won't describe every step i did to get ADF working because it was a lot of trial and error since it was the first time working with Azure Data Factory. The goal was to call the Azure Databricks notebook and insert the processed files into a SQL Server database. To do so, the following steps were done:
- Creation of the Linked Services
- Creation of the Datasets
- Design of the Pipeline
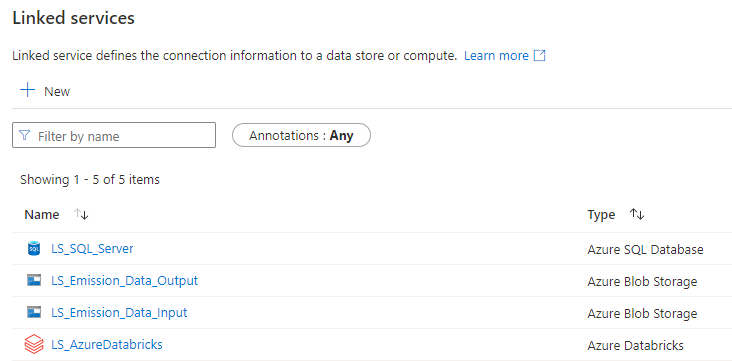
Linked Services
The first step of the process was to create the services to connect to the SQL Server database (to log the errors when they happened), the LS to connect to Azure Databricks and finally the two LS to connect to the two containers of the Storage Account.
Data Sets
After the services, it was time to create the Datasets, so I've created two datasets per CSV file, which were the datasets before and after processed.

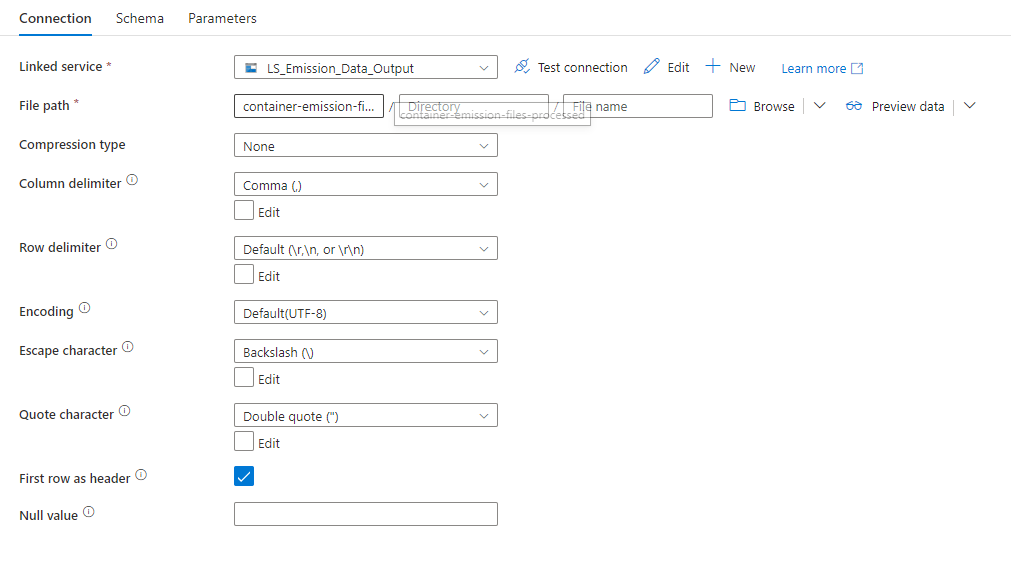
The following example was of the CO2 (input dataset), which uses the LS_Emission_Data_Input linked service to connect to the storage account. As you can see, when hitting the "Preview Data" button, the content of the file is displayed on the screen.

After processing the file, the LS_Emission_Data_Output was "called" to store the file inside the "container-emission-files-processed" container.
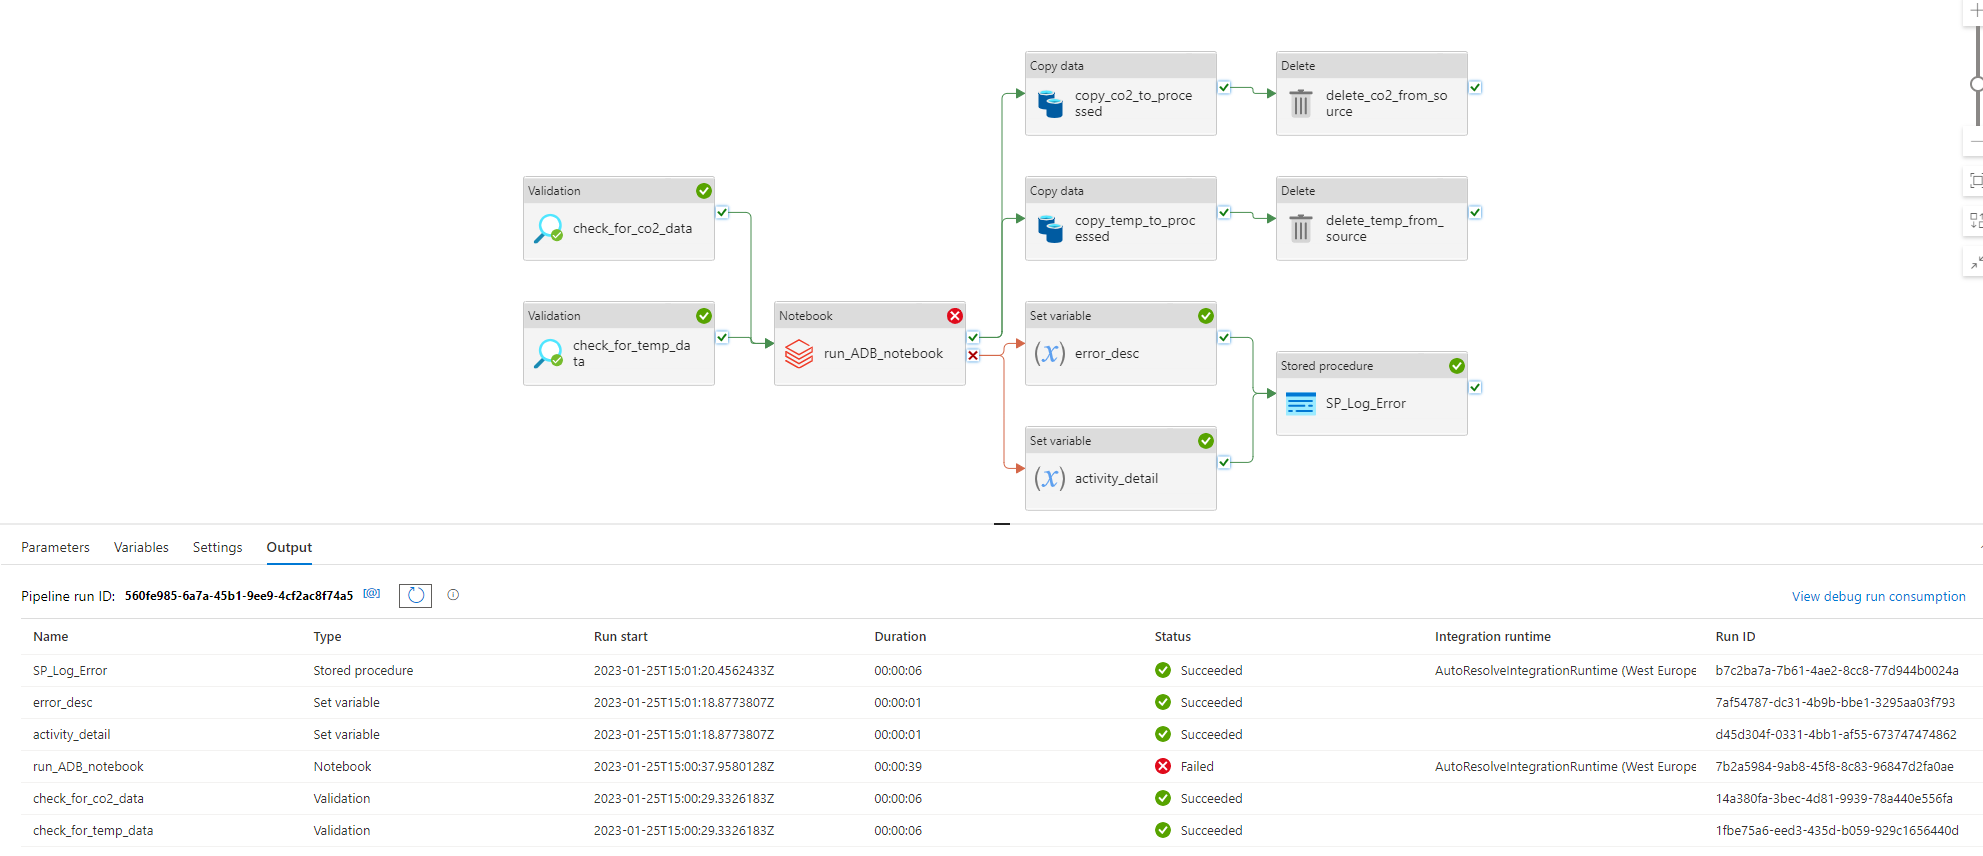
Final Pipeline
This was the final pipeline:
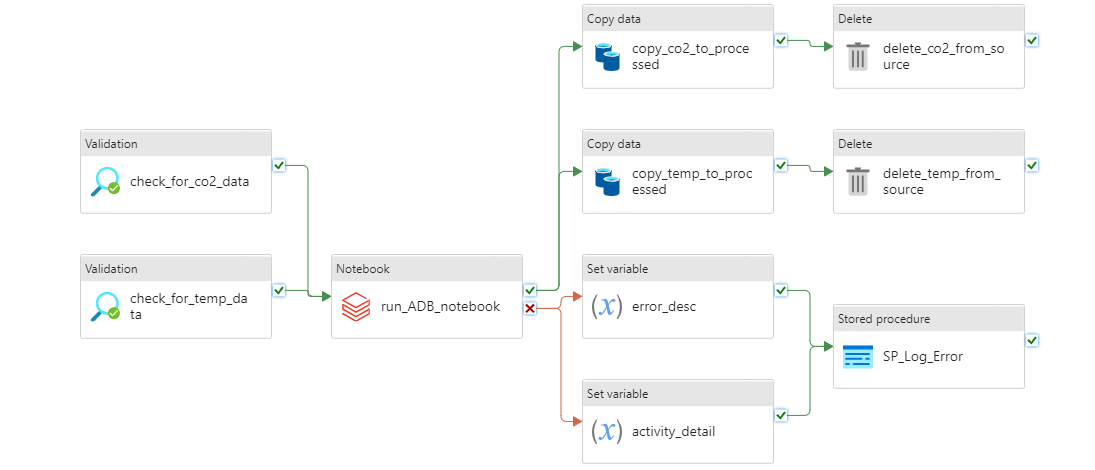
It was made up of the following activities:
- Two Validation activities called "check_for_co2_data" and "check_for_temp_data" that check if the file is in the "container-emission-files" to be processed;
- When on sucess in the previous task, a call to the Databricks Notebook that processes the CSV files;
- Two Set Variable activities that set the description of the error and the activity name when the Databricks task ends up on error;
- A Stored Procedure activity that was called when there is an error in Databricks process;
- Two Copy Data activities that copies the files from the source container to the "processed" container;
- Two Delete activities that delete the processed files from the source container.
When on sucess, the pipeline fills the SQL Server database tables:
Error Handling
Error handling is a part of the job. With a lot more time (and money, God! Databricks is expensive!) to do this project i would made it more robust in terms of error validation. But the key point was to see a possible approach to do the error handling. With that, i created a Stored Procedure that writes to a specific table the error detail information:

Azure Databricks
Databricks is a powerful platform. I've decided to try it. After creating a Standard Cluster (Standard_F4 with 8GB and 4 Cores), I used it's capabilities to process the two CSV files that I loaded with the help of PySpark. I could have use Pandas for this job, but let's leave it for another time. So, i built this notebook:
from pyspark.sql.functions import *


# If the mount point already exists, does not try to mount it again. Otherwise it will.
# Gets the password from the azure key vault.
mountPoint = "/mnt/container-emission-files"
if not any(mount.mountPoint == mountPoint for mount in dbutils.fs.mounts()):
    dbutils.fs.mount(source = "wasbs://container-emission-files@saemissionfiles.blob.core.windows.net",
    mount_point = mountPoint,   extra_configs = {"fs.azure.account.key.saemissionfiles.blob.core.windows.net":dbutils.secrets.get(scope = "databricks-secret-scope", key = "sa-acess-key")})

#database properties
db_pass = dbutils.secrets.get(scope="databricks-secret-scope", key= "db-emission-data-pwd")
jdbcUrl = "jdbc:sqlserver://az-server-emissions.database.windows.net:1433;database=db-emissions-data"
dbConnectionProperties = {
  "user" : "db-user",
  "password" : db_pass
}

def write_to_database(df, table_name):
    '''
    Writes processed df to database
    '''
    df.write.mode("append").jdbc(jdbcUrl, table_name,properties=dbConnectionProperties)

#Load Data
df_global_temperature = spark.read.format("csv").option("header", "true").load(mountPoint+"/GlobalLandTemperaturesByCountry.csv")
df_co2 = spark.read.format("csv").option("header", "true").load(mountPoint+"/owid-co2-data.csv")

#Country Data
df_country = df_co2.select([Co2Columns.COUNTRY, 'iso_code']).dropDuplicates()
df_country = df_country.na.drop()
df_country = df_country.sort(df_country['iso_code'].asc()).select("*").withColumn("id_country", monotonically_increasing_id()+1)
write_to_database(df_country, "processed_data.tr_country")

df_country_info = df_co2.select(['year', 'population', 'gdp', 'iso_code']).dropDuplicates()
df_country_info = df_country_info.na.drop()
df_country_info = df_country_info.withColumnRenamed("iso_code","iso_code_info")
df_country_info = df_country_info.join(df_country, df_country['iso_code'] == df_country_info['iso_code_info'], "inner")
df_country_info = df_country_info.drop('iso_code_info', 'country', 'iso_code')
write_to_database(df_country_info, "processed_data.td_country_info")

#Temperature Data
df_global_temperature = df_global_temperature.drop('AverageTemperatureUncertainty')
df_global_temperature = df_global_temperature.withColumnRenamed('dt', 'Date')
df_global_temperature = df_global_temperature.na.drop(how="any", subset=['AverageTemperature'])
df_global_temperature = df_global_temperature.withColumn('Date',year(df_global_temperature.Date))
df_global_temperature = df_global_temperature.groupBy(group_cols).agg(avg("AverageTemperature").alias("AverageTemperature_ByYear"))

df_co2_countries = df_co2.select(df_co2['iso_code'], df_co2['country']).dropDuplicates()
df_co2_countries = df_co2_countries.na.drop()
df_temperature_processed = df_global_temperature.join(df_co2_countries, df_global_temperature["Country"] == df_co2_countries["country"], "inner")
df_temperature_processed = df_temperature_processed.withColumnRenamed('Date', 'year').withColumnRenamed('AverageTemperature_ByYear','average_temperature')
df_temperature_final  = df_temperature_processed.join(df_country, df_temperature_processed["iso_code"] == df_country["iso_code"], "inner")
df_temperature_final = df_temperature_final.drop('country', 'Country', 'iso_code')
write_to_database(df_temperature_final, "processed_data.td_global_temperature")

#Methane Data
df_methane_emissions_processed = df_co2.select(['year', 'methane', 'methane_per_capita', 'iso_code']).dropDuplicates()
df_methane_emissions_processed = df_methane_emissions_processed.na.drop(how="any", subset=['iso_code'])
df_methane_emissions_processed = df_methane_emissions_processed.withColumnRenamed("iso_code","iso_code_2")
df_methane_emissions_processed = df_methane_emissions_processed.join(df_country, df_country['iso_code'] == df_methane_emissions_processed['iso_code_2'], "inner")
df_methane_emissions_processed = df_methane_emissions_processed.drop('iso_code','country', 'iso_code_2')
write_to_database(df_methane_emissions_processed, "processed_data.td_produced_methane")

#Nox Data
df_nox_processed = df_co2.select(['year', 'nitrous_oxide', 'nitrous_oxide_per_capita', 'iso_code']).dropDuplicates()
df_nox_processed = df_nox_processed.na.drop(how="any", subset=['iso_code'])
df_nox_processed = df_nox_processed.withColumnRenamed("iso_code","iso_code_2")
df_nox_processed = df_nox_processed.join(df_country, df_country['iso_code'] == df_nox_processed['iso_code_2'], "inner")
df_nox_processed = df_nox_processed.drop('iso_code','country', 'iso_code_2')
write_to_database(df_nox_processed, "processed_data.td_produced_nox")

#Green House Gas Data
df_ghg_processed = df_co2.select(['year', 'ghg_per_capita', 'total_ghg', 'iso_code']).dropDuplicates()
df_ghg_processed = df_ghg_processed.na.drop(how="any", subset=['iso_code'])
df_ghg_processed = df_ghg_processed.withColumnRenamed("iso_code","iso_code_2")
df_ghg_processed = df_ghg_processed.join(df_country, df_country['iso_code'] == df_ghg_processed['iso_code_2'], "inner")
df_ghg_processed = df_ghg_processed.drop('iso_code','country', 'iso_code_2')
write_to_database(df_ghg_processed, "processed_data.td_produced_ghg")

#Co2 Consumption Data
df_co2_consumption_processed = df_co2.select(['year', 'consumption_co2', 'consumption_co2_per_capita', 'consumption_co2_per_gdp', 'iso_code']).dropDuplicates()
df_co2_consumption_processed = df_co2_consumption_processed.na.drop(how="any", subset=['iso_code'])
df_co2_consumption_processed = df_co2_consumption_processed.withColumnRenamed("iso_code","iso_code_2")
df_co2_consumption_processed = df_co2_consumption_processed.join(df_country, df_country['iso_code'] == df_co2_consumption_processed['iso_code_2'], "inner")
df_co2_consumption_processed = df_co2_consumption_processed.drop('iso_code','country', 'iso_code_2')
write_to_database(df_co2_consumption_processed, "processed_data.td_consumption_co2")

#Co2 Production Data
df_co2_processed = df_co2.select(['year', 'cement_co2', 'cement_co2_per_capita', 'co2_including_luc', 'co2_per_capita', 'co2_per_gdp', 'coal_co2', 'coal_co2_per_capita', 'flaring_co2', 'flaring_co2_per_capita', 'gas_co2' , 'gas_co2_per_capita', 'oil_co2','oil_co2_per_capita', 'other_co2_per_capita', 'other_industry_co2', 'iso_code']).dropDuplicates()
df_co2_processed = df_co2_processed.na.drop(how="any", subset=['iso_code'])
df_co2_processed = df_co2_processed.withColumnRenamed("iso_code","iso_code_2").withColumnRenamed("other_industry_co2","other_co2").withColumnRenamed("co2_including_luc","total_co2").withColumnRenamed("co2_per_capita","total_co2_per_capita").withColumnRenamed("co2_per_capita","total_co2_per_capita").withColumnRenamed("co2_per_gdp","total_co2_per_gdp")
df_co2_processed = df_co2_processed.join(df_country, df_country['iso_code'] == df_co2_processed['iso_code_2'], "inner")
df_co2_processed = df_co2_processed.drop('iso_code','country', 'iso_code_2')
write_to_database(df_co2_processed, "processed_data.td_produced_co2")

dbutils.fs.unmount("/mnt/container-emission-files")
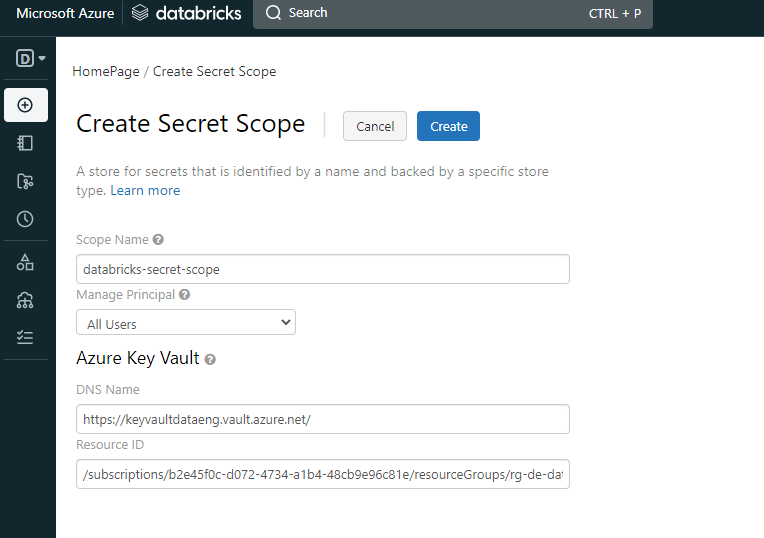
It is a big one, but it's simple. What it does is to access the storage account (with the mount option) and load the CSV files to memory. After that, it just selects the columns from each file to have the information that i needed. All of the joins were made with the country table, to avoid duplicate entry values. After this, each dataframe was written to the database. One of the challenges was to include the secrets into the notebook, but with the help of Microsoft and Databricks documentation, I was able to avoid plain text passwords inside the notebook. To do so, with the Azure Key Vault already created, i needed to create a Secret Scope to allow me connect to the Key Vault.
After this, it was possible to access the password from the key vault with the following:
db_pass = dbutils.secrets.get(scope="databricks-secret-scope", key= "db-emission-data-pwd")
Other Azure Services
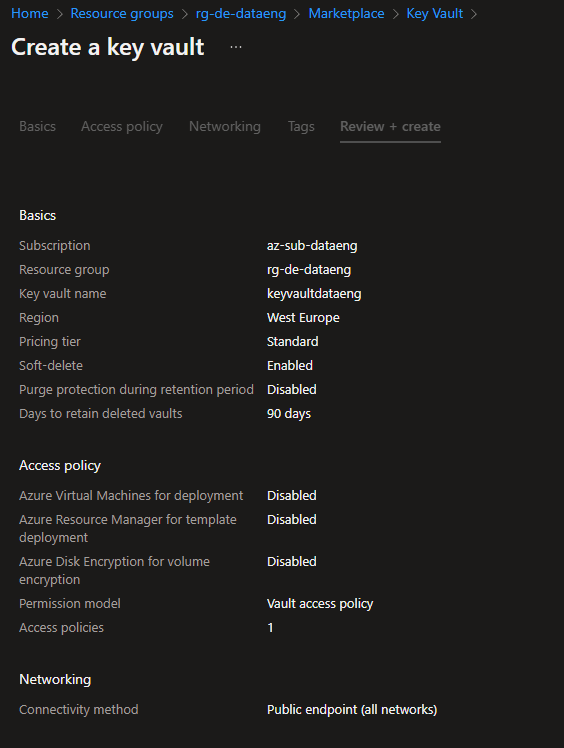
Azure Key Vault
To store the passwords from Storage Account and SQL Server access, I chose the Azure Key Vault to do so. This was the first time working with this service. So, I just needed to create a Key Vault, create two secrets and that's it!
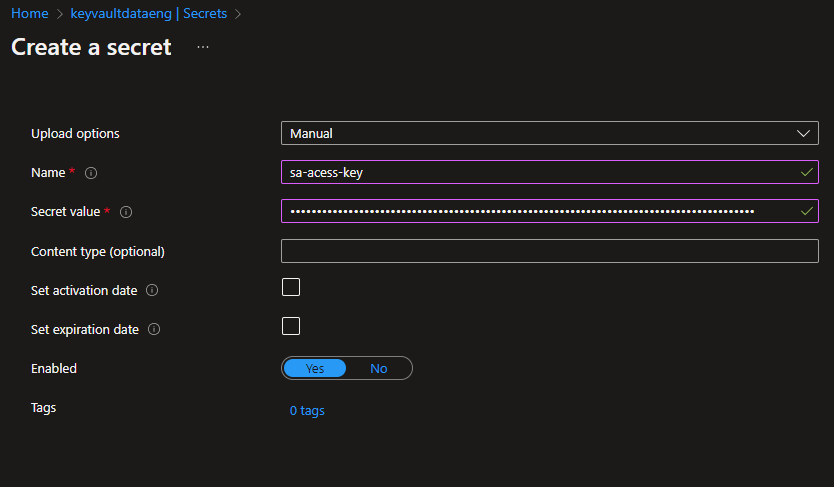
The great advantage of this service is that it stores the password encrypted and all of the other Azure Services can access those passwords.
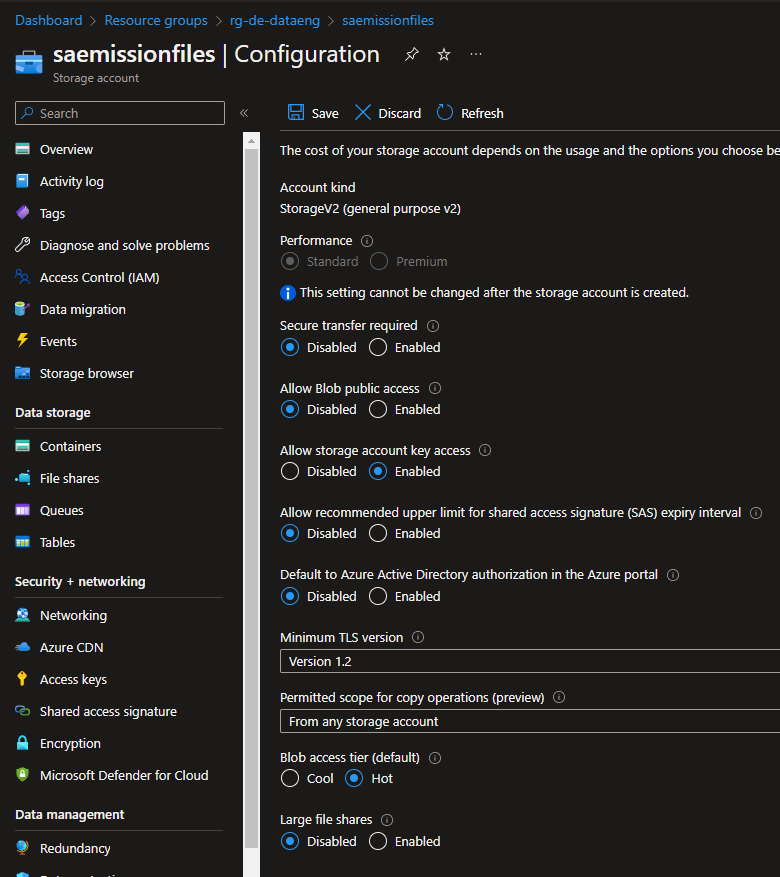
Azure Storage Account
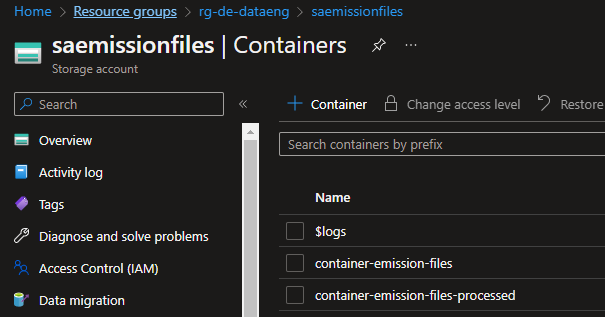
To store the files before and after being processed, I chose an Azure Storage Account. Since this is a PoC project, the configurations were selected to be the "minimum" available to have the files in there. The only change I needed to do on the storage account was to allow the "Storage Account Key Access" option. Without changing this parameter, I was not able to run the Validation task on ADF.
Since the ADF pipeline had a task to copy the files from the source container to the processed container, there was a need to create two containers, the "container-emission-files" and the "container-emission-files-processed".
Azure SQL Server
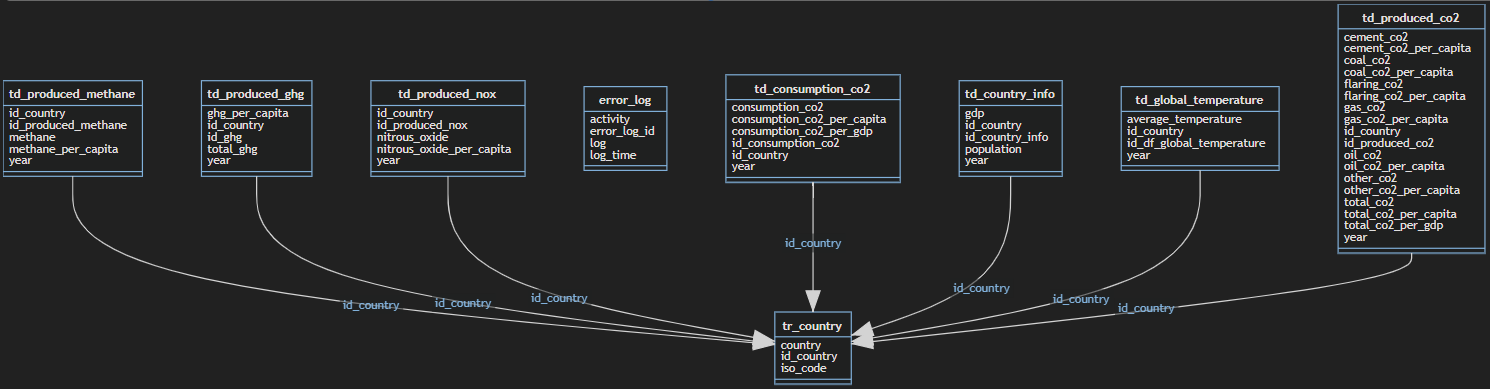
To store the processed CSV files, I've create a SQL Server Database to write the information gathered and filtered from the CSV files.
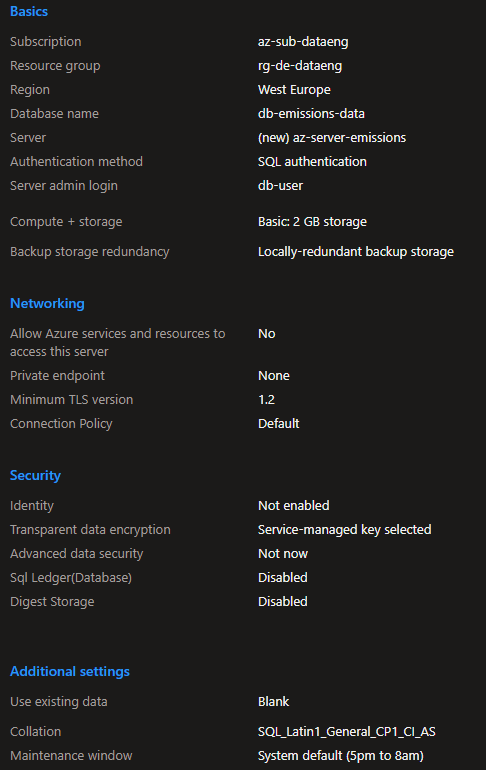
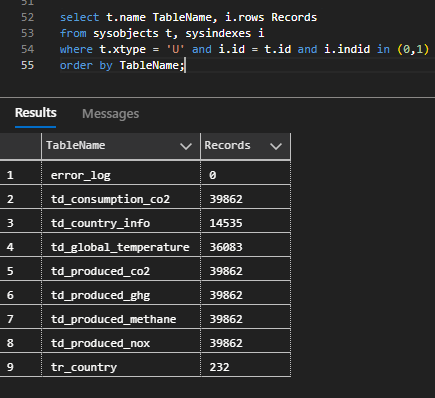
After this done, I've designed a simple data model to settle the information. This data model had the following tables and schemas:
- error_handling.error_log - stores the errors thrown by Azure Databricks
- processed_data.td_consumption_co2 - stores the CO2 consumption data
- processed_data.td_country_info- _stores the details of the countries like gdp and population__
- processed_data.td_global_temperature- stores the global temperature information
- processed_data.td_produced_co2- stores the produced CO2 data
- processed_data.td_produced_ghg- stores the produced Green House Gas emissions data
- processed_data.td_produced_methane- stores the produced methane emissions data
- processed_data.td_produced_nox- stores the produced nox emissions data
- processed_data.tr_country- stores the countries that exist in both data files
Conclusions & Further Steps
This was the first ETL process that I've made entirely on the Cloud. Work with Azure Data Factory and Azure Databricks was a process of trial and error until I was able to made it work. It was a "fun ride", and I am quite happy with the result. To this display the processed data, I've decided to work with Metabase again since it is, in my opinion, the most straightforward software to do dashboards! I'm a huge fan, I have to admit it! But the main goal of this project wasn't make the display of the data to shine, it was to learn the "behind the scenes" technology that can be used to ingest and transform large amounts of CSV (or other types of files) in the Cloud. For the future, it would be nice to automatically donwload the files from Kaggle (with a Python script, for example) and load it to the Azure Storage Account based on a schedule, similarly with what i've done with F1 Project into Google Cloud Storage.